Listen to This Article:
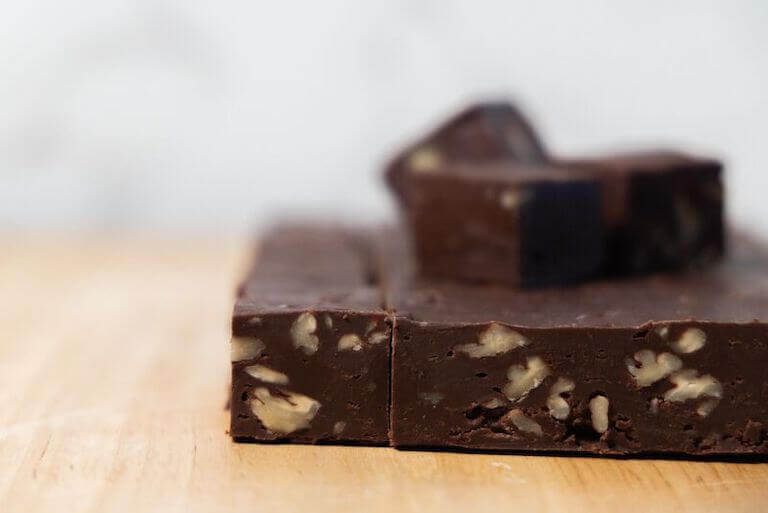
What’s not to love about fudge? It melts in your mouth, coating your tongue in rich and creamy sweetness.
However, making meltaway fudge isn’t always easy! If you don’t understand the proper techniques, you may end up with a grainy or crumbly fudge rather than a creamy confection.
If you want to get a better hold on making fudge, join us as we dive into some of the culinary science that pastry arts students can explore during their time at Escoffier.
What Is Fudge?
Fudge, while sweet and delicious, can leave those enjoying it with questions. What is fudge? Is it chocolate? Is it candy? Where did it come from?
While many think of fudge as chocolate, that’s not the case. Fudge is a type of candy. It’s a smooth, creamy, soft confection similar to yet different from caramel. So, while there are scrumptious options that incorporate chocolate to flavor the fudge, it doesn’t need to include chocolate to be fudge.
There’s no denying the popularity of the candy, especially in tourist locations, but the origins of fudge are somewhat unclear. Rumor has it that over a century ago, a confectioner made an error while making caramel and accidentally invented fudge. The term “fudge” has been known to mean “foolish nonsense” or “to fail to perform as expected,” which could corroborate the story; however, there’s no documentation to prove this rumor true.
Instead, many point back to 1888 when women at Vassar College began making fudge in their dorms. Emelyn Battersby Hartride is credited with the first documented recipe for fudge, which included sugar, light cream, unsweetened chocolate, and butter. While it was a popular treat in the dorms, it’s still not believed to be the original recipe for fudge. So while some fudge questions can be answered, others remain a mystery.

Get the Home-Based Bakery Guide
Ready to kickstart your flexible food venture from the comfort of home? Discover secrets to pricing, social media marketing, and more in this guide to launching your home-based bakery!
How to Make Fudge
The simplest fudge recipes start with three ingredients found in many types of confections: sugar, butter, and milk. However, some recipes contain variations on these ingredients, like swapping sweetened condensed milk for the milk and sugar, or semi-sweet chocolate chips for some of the sugar.
In addition, you can add your favorite flavors as you make fudge. Popular options include chocolate, peanut butter, and maple syrup. You can even elevate the flavor further by adding ingredients such as nuts, marshmallows, or dried fruit.
The fudge-making process will be similar regardless of the exact ingredients you use. First, you’ll heat the ingredients to dissolve the sugar and create a homogenous mixture. Next, you’ll cook the mixture until it thickens. Finally, you’ll remove the fudge from the heat, allow it to cool, and then mix thoroughly.
Tips for Making Fudge
Smooth, creamy, and decadent fudge relies on proper technique, so keep these tips in mind when whipping up your next batch.
1. Monitor the Temperature with a Candy Thermometer
If you end up with soft fudge that turns into a puddle in your hands or hard fudge that is a bit reminiscent of a crunchy candy, improper temperature is likely to blame. If you don’t heat your fudge to a high enough temperature, you’ll end up with a soft product. And if you heat the mixture too much, your fudge may be harder than you’d like.
When you’re cooking over the stove, you should aim for a maximum fudge temperature between 234-237ºF. Yes, that’s only a three-degree range! To ensure you remove your fudge from the heat as soon as it reaches this temperature, you should monitor the mixture with a candy thermometer.
Fudge Temperature Stages: Achieving the Perfect Texture
When making fudge, achieving the right temperature is essential for that smooth, creamy consistency. Let’s break down the key temperature stages you’ll encounter during fudge-making:
- Thread Stage (230°F – 234°F): You haven’t quite reached the ideal fudge range at this stage. You can check if you’re in this stage by dropping a little into cold water. The mixture will form thin threads, but it’s not ready for fudge yet.
- Soft Ball Stage (234°F – 237°F): This is the sweet spot for fudge! The mixture will form a soft, malleable ball in cold water that flattens slightly when pressed. Reaching this stage helps ensure your fudge will be smooth and creamy once it cools.
- Firm Ball Stage (242°F – 248°F): If your fudge mixture is heated beyond the soft ball stage, it enters the firm ball stage. Fudge made at this temperature will be much harder and may have a grainy texture.
- Hard Ball Stage (250°F – 265°F and beyond): Going above the firm ball stage will result in a texture too hard for fudge. This temperature is more suited for nougat or hard candies because you lose the creamy, melt-in-your-mouth quality necessary for fudge.
2. Avoid Stirring Once the Mixture Comes to a Simmer
Another key part of a successful fudge texture is when you stir the mixture. Stirring the sugar and milk during the initial stages of cooking allows the sugar to dissolve. However, once the mixture comes to a boil, it’s time to put the spoon down.
Stirring can introduce air into the mix and encourage the molecules in sugar, known as sucrose, to connect with each other, forming larger crystals. While crystallization is the goal if you’re making hard candy, crunchy sugar bits can quickly ruin a fudge’s silky smooth texture.
3. Mix Thoroughly
Although you shouldn’t mix the fudge mixture when it’s hot, you should mix it once it has been removed from the heat and cooled.
Once again, turn to your candy thermometer. When the mixture has cooled to 110ºF (but not a moment before), it’s time to pick up a wooden spoon and begin stirring. (A wooden spoon is used because wood doesn’t conduct heat the way a metal spoon does. If you use a metal spoon, it may cool parts of the mix faster, possibly causing crystallization.) Continue mixing the fudge until it has lost most of its sheen, about 5–10 minutes.
If you mix the fudge when it’s too hot, the sugar particles may lump together and form discernable crystals. Therefore, monitoring the temperature is key!
Proper technique is an essential part of creating silky smooth fudge.
Chocolate Fudge Recipe
Keep the previous fudge tips in mind as you follow this recipe for chocolate fudge.
Ingredients
- 28 oz granulated sugar
- 12 oz whole milk
- 6 oz corn syrup
- 4 oz butter
- 5 oz unsweetened chocolate
- ¼ tsp salt
- 1 tbsp vanilla
Directions
- Prepare an 8×8 pan by lining it with butter-coated parchment paper or aluminum foil.
- Place the sugar, milk, and corn syrup in a medium saucepan and stir well. Once the mixture begins to boil, stop stirring. Monitor the mixture and watch for it to reach 230ºF.
- Add the butter, chocolate, salt, and vanilla and bring the temperature up to 235ºF. Remove from heat.
- Once the mixture has cooled to 110ºF, mix it with a wooden spoon until it loses the majority of its sheen.
- Pour the mixture into the prepared pan and let it cool fully before slicing.
Frequently Asked Questions When Making Fudge
How Do I Fix Grainy Fudge?
Remember, grainy fudge happens when sugar crystals form during the cooking process. To avoid this, ensure you dissolve the sugar completely by cooking the mixture over low heat before bringing it to a boil. Once it simmers, avoid stirring, as this can encourage crystal formation. If your fudge has already turned grainy, you can attempt to reheat it with a small amount of water to dissolve the sugar crystals, then recook it to the proper temperature.

How Does Altitude Affect Fudge Preparation?
The thinner air—less oxygen—at higher altitudes affects cooking temperatures, even for simple things like boiling water. Typically, water boils at 212°F, but once you hit 2,000 feet above sea level, it boils at 208°F. This means if you’re making fudge at higher altitudes, you need to adjust your fudge temperature.
Some people use a standard calculation of reducing the temperature by 2°F for every 1,000 feet that they’re above sea level; however, there is a more accurate strategy. Place a candy thermometer into a pot of water and see what temperature it begins to boil. Then, make your adjustment based on that temperature. For example, if the water boils at 204°F instead of 212°F, you’ll want to decrease your fudge temperature by 8°F.
How Long Does Fudge Last?
Not long if you have a sweet tooth! But if you make a large batch of fudge, you can store it at room temperature in an airtight container for one to two weeks. You can also prolong the life of the fudge by keeping it in the refrigerator for up to three weeks. But if you’re looking for maximum storage, you can wrap it tightly in wax paper, place it in a freezer-safe container, and freeze it for up to three months.
Can I Make Fudge Without a Candy Thermometer?
While a candy thermometer makes the fudge-making process easier, you can get by without it by using the “soft ball” test—drop a small amount of the fudge mixture into cold water. It has reached the right temperature if it forms a soft, pliable ball that flattens between your fingers.
Can I Use a Double Boiler to Make Fudge?
Using a double boiler can help avoid scorching ingredients when making fudge. A double boiler involves placing a heat-safe bowl on top of a pot filled with simmering water. You place your fudge ingredients in the bowl, and the indirect heat from the boiling water gently melts them with less risk of burning them.

A double boiler can help make it easier not to heat the ingredients past the ideal temperature.
Is It Possible to Make Vegan Fudge?
Absolutely! There are several simple ingredient swaps you can make to enjoy a delicious slab of fudge on a vegan diet. For example, you can use ingredients like condensed coconut milk, or evaporated oat milk instead of milk or sweetened condensed milk. Coconut oil or nut butter can be added instead of butter. You can avoid animal bone char by replacing sugar with coconut sugar. And there are many sweetener and flavoring options you can use like vanilla, cacao powder, maple syrup, or agave syrup.
While some vegan fudge recipes call for honey, maple syrup can be a better substitute. Crystals in the honey can contribute to crystallization in the fudge mixture, while syrup can help keep the mix smooth.
A Beginners Guide to Cooking
Want to how to improve your presence in the kitchen? Discover easy steps to do so with our Beginners Cooking Guide.
Continue Improving Your Pastry Skills
Now that you know some of the tips for making fudge, it’s time to think about what other confections and baked goods you’d like to create! Whether you want to make a chewy yet tender loaf of bread or decorate a cake with smooth fondant and intricately piped roses, understanding the technique behind successful dishes is key.
Pastry school can introduce you to both the science and art involved in creating some of your favorite sweet treats and savory baked goods. By working with talented chef instructors, you can explore inside tricks and tips and receive individualized feedback as you practice creating new dishes.
By the time students graduate from baking & pastry school, many find they are ready to move toward career goals like starting a bakery or beginning a career as a cake decorator. If you’d like to take the next step to accomplish your pastry dreams, contact us for more information.
TO LEARN MORE ABOUT BAKING & PASTRY, CHECK THESE OUT NEXT:
- Cake Decorating Tips: How to Choose the Right Pastry Bag
- What Is It Like to Be a Pastry Chef?
- 6 Advanced Baking Techniques Every Pastry Chef Should Know
This article was originally published on December 25, 2016, and has since been updated.